Day22 Swagger 1
uwupu 啦啦啦啦啦

Swagger

https://swagger.io/

简介

  • 号称世界上最流行的Api框架。
  • Restful Api 文档在线自动生成工具 -> Api文档与Api定义同步更新
  • 直接运行,可以在线测试API接口;
  • 支持多种语言:Java,PHP…

image

依赖

1
2
3
4
5
6
7
8
9
10
<dependency>
<groupId>io.springfox</groupId>
<artifactId>springfox-swagger2</artifactId>
<version>3.0.0</version>
</dependency>
<dependency>
<groupId>io.springfox</groupId>
<artifactId>springfox-swagger-ui</artifactId>
<version>3.0.0</version>
</dependency>

集成

  1. 创建SpringBoot项目

  2. 添加依赖

  3. 编写HelloController

  4. 配置SwaggerConfig

    1
    2
    3
    4
    @Configuration
    @EnableSwagger2 //开启Swagger2
    public class SwaggerConfig {
    }
  5. 测试运行。默认URL:http://localhost:8080/swagger-ui.html

配置

配置Swagger依据Swagger的bean实例Docket;

配置Docket Bean

先配置一个默认的配置

1
2
3
4
5
6
7
8
9
10
@Configuration
@EnableSwagger2 //开启Swagger2
public class SwaggerConfig {

//配置了Swagger Docket的Bean实例
@Bean
public Docket docket(){
return new Docket(DocumentationType.SWAGGER_2);
}
}
  • 创建一个SwaggerConfig,使用**@Configuration注解@EnableSwagger2注解**
  • 配置Bean Docket。返回值为**new Docket(DocumentationType.SWAGGER_2)**。
  • 这样就完成了默认的配置。

apiInfo() 自定义Swagger页面介绍部分内容

1
2
3
4
5
6
7
8
9
10
11
12
13
14
15
16
17
18
19
20
21
22
23
24
@Configuration
@EnableSwagger2 //开启Swagger2
public class SwaggerConfig {

//配置了Swagger Docket的Bean实例
@Bean
public Docket docket(){
return new Docket(DocumentationType.SWAGGER_2).apiInfo(uwupu_apiInfo());
}

//配置Swagger信息 apiInfo
private ApiInfo uwupu_apiInfo(){
return new ApiInfo(
"uwupu的Swagger API 文档",
"这个作者有点...懒,什么也没有留下。",
"1.0",
"https://uwupu.tk/",
new Contact("uwupu", "https://uwupu.tk", "[email protected]"), //作者信息
"Apache 2.0",
"http://www.apache.org/licenses/LICENSE-2.0",
new ArrayList<VendorExtension>()
);
}
}
  • 使用Docket的方法apiInfo传入一个自定义的ApiInfo对象,即可实现自定义;

  • 自定义的ApiInfo对象可以调整的内容:

    • 标题
    • 描述
    • 版本
    • team链接
    • 联系方式 new Contact(名字,连接,Email)
    • 许可
    • 许可Url

    image

select() 配置扫描接口的方式

使用方式:

1
2
3
4
5
6
7
8
9
10
11
12
13
14
@Bean
public Docket docket(){
return new Docket(DocumentationType.SWAGGER_2)
.apiInfo(uwupu_apiInfo())
//配置扫描接口的方式
.select()
//RequestHandlerSelectors配置扫描接口的方式
//basePackage配置通过包扫描接口 一般用这个
.apis(RequestHandlerSelectors.basePackage("com.yn.controller"))
//过滤指定路径
//通过路径指定过滤路径
.paths(PathSelectors.ant("/hello/**"))
.build();
}
apis() 通过类与方法的包或注解选择扫描的方式
  • **RequestHandlerSelectors.basePackage(“com.yn.controller”)**:通过包方式扫描接口;
  • **RequestHandlerSelectors.withClassAnnotation(Controller.class)**:通过类上的注解配置要扫描的类;
  • **RequestHandlerSelectors.withMethodAnnotation(GetMapping.class)**:通过方法上的注解配置要扫描的方法;
  • **RequestHandlerSelectors.any()**:所有;
  • **RequestHandlerSelectors.none()**:都不扫描。
paths() 通过url配置扫描的方式
  • **PathSelectors.ant(“/hello/**“)**:配置扫描的指定路径;
  • *PathSelectors.regex(“.“)**:通过正则配置扫描的路径;
  • PathSelectors.any() 所有
  • PathSelectors.none() 没有
enable(false); 默认关闭Swagger页面

可以配置是否启用Swagger,

  • true,Swagger不能在浏览器访问;
  • false,Swagger可以在浏览器访问。
1
2
3
4
5
6
@Bean
public Docket docket(){
return new Docket(DocumentationType.SWAGGER_2)
.apiInfo(uwupu_apiInfo())
.enable(false);
}

image

groupName(“第一个组”)分组命名
1
2
3
4
@Bean
public Docket docket3(){
return new Docket(DocumentationType.SWAGGER_2).groupName("第三个组");
}

为当前组命名,影响页面右上角切换组的时候显示的名字。

配置API文档分组

  • 一个Docket就表示一个分组,只需要配置多个Docket,并且都放进Bean,就可实现多个分组。

  • 一个Docket可以配置多个内容,包括页面显示内容、扫描的类或方法、是否开启等,各个Docket之间互不影响。

  • (在实际情况下,每个部分都配置一个Docket,都可以配置不同的页面显示内容。)

  • 当一个Docket的enable处于false,其他的处于true,则页面不显示处于false的Docket。

代码

1
2
3
4
5
6
7
8
9
10
11
12
13
14
15
16
17
18
@Bean
public Docket docket3(){
return new Docket(DocumentationType.SWAGGER_2).groupName("第三个组");
}

@Bean
public Docket docket2(){
return new Docket(DocumentationType.SWAGGER_2).groupName("第二个组");
}


//配置了Swagger Docket的Bean实例
@Bean
public Docket docket(Environment environment){
return new Docket(DocumentationType.SWAGGER_2)
.groupName("uwupu");
.apiInfo(uwupu_apiInfo()));
}

效果

image

通过注解添加注释

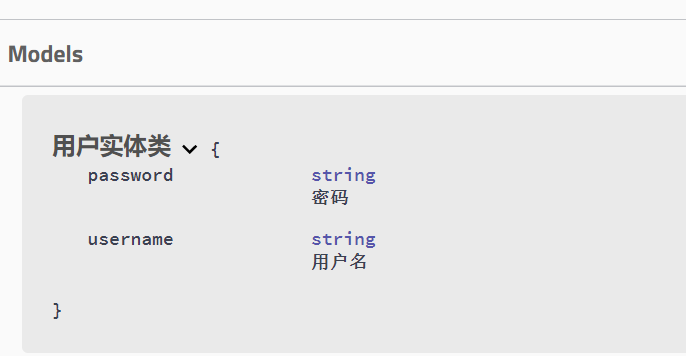
@ApiModel、@ApiModelProperty为实体类添加注释

1
2
3
4
5
6
7
@ApiModel("用户实体类")
public class User {
@ApiModelProperty("用户名")
private String username;
@ApiModelProperty("密码")
private String password;
}
image

其他注解

  • @Api将一个标记为Swagger资源(Swagger不会因为这个扫描这个类)。可以指定在文档中类所在的路径。待完善..

  • @ApiImplicitParam

  • @ApiImplicitParams

  • @ApiOperation:声明API资源中的单个操作。

    1
    2
    3
    4
    5
    6
    7
    8
    9
    10
    @RequestMapping(value = "/hello")
    @ApiOperation(
    value = "Hello方法",
    notes = "用于测试项目正常运行的第一个方法",
    response = String.class,
    responseContainer = "none"
    )
    public String hello(){
    return "hello";
    }

    image

  • @ApiParam:为操作参数添加注释

    1
    2
    3
    4
    5
    6
    7
    8
    9
    @RequestMapping(value = "/hello")
    public String hello(
    @ApiParam(
    value = "用户名",//参数备注
    required=true//是否必要
    )
    String username){
    return "hello";
    }

    image

  • @ApiResponses、@ApiResponse:描述操作可能的响应。

    1
    2
    3
    4
    5
    6
    7
    8
    9
    10
    @RequestMapping(value = "/hello")
    @ApiResponses(
    {
    @ApiResponse(code=400,message = "错误的输入"),
    @ApiResponse(code=404,message = "未找到用户")
    }
    )
    public String hello(String username){
    return "hello";
    }

    image

  • @Authorization、@AuthorizationScope:这些仅用于@Api和@ApiOperation的输入,而不是直接的资源操作。用来指定需要哪种授权方案。

对于一个API的近似完整的注释

1
2
3
4
5
6
7
8
9
10
11
12
13
14
15
@RequestMapping(value = "/hello")
@ApiOperation(
value = "Hello方法",
notes = "用于测试项目正常运行的第一个方法",
response = String.class,
responseContainer = "none"
)
@ApiResponses(
{@ApiResponse(code=400,message = "错误的输入"),
@ApiResponse(code=404,message = "未找到用户")}
)
public String hello(
@ApiParam(value = "用户名",required=true)String username){
return "hello";
}

注意

如何让Swagger扫描到pojo类

只要在Controller中有返回值为pojo类的Mapping就可

1
2
3
4
@RequestMapping("/user")
public User user(){
return new User();
}

从源码介绍

ApiInfo配置页面的显示内容

1
2
3
4
5
6
7
8
9
10
11
12
13
14
15
16
17
18
19
20
21
22
23
24
25
26
27
28
29
30
31
32
33
34
35
36
37
38
39
40
41
public class ApiInfo {

public static final Contact DEFAULT_CONTACT = new Contact("", "", "");
public static final ApiInfo DEFAULT = new ApiInfo("Api Documentation", "Api Documentation", "1.0", "urn:tos",
DEFAULT_CONTACT, "Apache 2.0", "http://www.apache.org/licenses/LICENSE-2.0", new ArrayList<VendorExtension>());

private final String version;//版本
private final String title;//标题
private final String description;//描述
private final String termsOfServiceUrl;
private final String license;//
private final String licenseUrl;
private final Contact contact;
private final List<VendorExtension> vendorExtensions;
/**
* Deprecated in favor of richer contact object
* @deprecated @since 2.4.0
*
* @param title title
* @param description description
* @param version version
* @param termsOfServiceUrl terms of service
* @param contactName contact name
* @param license licence text
* @param licenseUrl license url
*/
@Deprecated
public ApiInfo(
String title,
String description,
String version,
String termsOfServiceUrl,
String contactName,
String license,
String licenseUrl) {
this(title, description, version, termsOfServiceUrl, new Contact(contactName, "", ""), license, licenseUrl, new ArrayList<VendorExtension>());
}

//getter,setter,...
}

总结

  • 通过Swagger可以实时创建一个接口文档,
  • 可以给接口进行注释,
  • 可以在线测试

注意:在生产环境下,关闭Swagger。

我只希望我的Swagger在生产环境中使用,发布时不使用?

方法1:

  1. 为生产环境和开发环境配置不同的配置;

    image

  2. 通过下面的方式可以获得当前是否为指定环境,传值到enable方法里,就可以在开发环境下开启Swagger,其他环境下关闭Swagger。

    1
    2
    3
    4
    5
    6
    7
    8
    9
    10
    11
    12
    13
    14
    //配置了Swagger Docket的Bean实例
    @Bean
    public Docket docket(Environment environment){

    //依据环境切换Swagger的状态:dev:开启 pro:关闭
    //获取配置
    Profiles profiles = Profiles.of("dev","test");
    //判断是否处于指定的运行环境
    final boolean flag = environment.acceptsProfiles(profiles);


    return new Docket(DocumentationType.SWAGGER_2)
    .enable(flag);
    }
    • Profiles.of("dev","test")可以获得指定环境的配置对象Profiles,然后使用environment.acceptsProfiles(profiles)判断是否为指定环境运行,返回值为布尔值。

      1
      2
      3
      Profiles profiles = Profiles.of("dev","test");
      //判断是否处于指定的运行环境
      final boolean flag = environment.acceptsProfiles(profiles);
    • Docket.enable方法可以设定开启或关闭Swagger。

方法2

Hole….

其他

前后端分离

  • 后端:控制层、服务层、数据访问层 【后端团队】

  • 前端:前端控制层、视图层 【前端团队】

    • 伪造后端数据,json。已经存在,不需要后端,前端工程能够跑起来。
  • 前后端交互:API

  • 前后端相对独立,松耦合;

  • 前后端可以部署在不同的服务器上;

  • 缺点:

    • 前后端集成联调,前端人员和后端人员无法做到及时协调,尽早解决,最后导致问题集中爆发。
      • 解决方案:制定一个schema(计划的提纲),实时更新最新的API,降低集成的风险。
 评论